A Step-by-Step Guide on How to Split Vanilla Beans for Maximum Flavor

Vanilla beans are one of the most luxurious and aromatic ingredients used in culinary arts. Unlike synthetic extracts, real vanilla beans infuse your dishes with a rich, complex flavor that transforms the ordinary into something truly special. Whether you’re making desserts, drinks, or even savory dishes, cooking with real vanilla starts with one essential step—splitting the bean properly.
In this step-by-step guide, you’ll learn exactly how to split vanilla beans to ensure you get the most flavor out of every pod. With the right technique, you’ll be able to unleash the full potential of this aromatic treasure and elevate your recipes to the next level.
Why Use Whole Vanilla Beans?
Before diving into the process, let’s understand why whole vanilla beans are worth the extra effort. When you use the actual bean, you’re getting both the seeds and the pod, which hold powerful aromatic oils. These oils are what give vanilla its signature fragrance and taste. Unlike extract or paste, whole beans give you full control over the strength and purity of flavor.
Moreover, the vanilla bean adds not only taste but also a luxurious texture and visual appeal to your dishes. Tiny black specks scattered in custard or ice cream are a clear sign of quality and care in preparation.
Tools You’ll Need
Before you begin, gather the following tools for smooth and precise vanilla bean preparation:
-
A sharp paring knife or chef’s knife
-
A clean cutting board
-
A small spoon (optional but helpful)
-
A glass jar or container (if storing the pod)
Having the right tools will make the process easier and more efficient. A dull knife, for instance, could tear the bean instead of slicing it cleanly, causing you to lose precious seeds.
Step 1: Select High-Quality Vanilla Beans
To begin, choose vanilla beans that are plump, moist, and pliable. Avoid beans that feel dry, brittle, or look shriveled. Fresh vanilla beans should have a shiny, slightly oily surface and a deep, rich aroma. High-quality beans ensure maximum flavor and ease of use when it comes time to split them.
Step 2: Place the Bean on a Cutting Board
Lay the vanilla bean flat on a clean cutting board. Make sure the bean is straight and stable before cutting. This gives you more control and reduces the risk of injury.
If the bean is slightly curved or twisted, gently press it with your fingers to straighten it out before slicing.
Step 3: Use a Sharp Knife to Split the Bean
This is the most critical step in learning how to split vanilla beans properly.
Hold one end of the bean firmly with one hand. With the other hand, take your sharp paring knife and position it at the top of the bean. Carefully slice lengthwise through the top layer of the pod, being cautious not to cut all the way through.
The goal is to open the bean like a book—just deep enough to expose the seeds inside but keep both halves attached.
Tip: Go slow and use steady pressure to avoid damaging the pod or losing the seeds.
Step 4: Scrape the Seeds
Once you’ve split the vanilla bean, it’s time to extract the seeds. Open the bean slightly with your fingers, exposing the sticky black seeds inside.
Take the dull edge of your knife or a small spoon and scrape from one end to the other, gathering all the seeds along the way. These tiny black flecks are packed with flavor and aroma. This is where the magic lies—the seeds will deliver an intense, aromatic boost to whatever you’re making.
Step 5: Use the Seeds and Pod
Now that you’ve scraped the seeds, don’t toss the pod! Both parts can be used. The seeds are perfect for recipes that require a rich vanilla profile, like ice cream, custards, cookies, and cakes.
As for the pod, it still has plenty of flavor left. You can:
-
Simmer it in milk or cream for puddings
-
Infuse it in sugar to make vanilla sugar
-
Add it to jars of coffee, tea, or syrup
-
Use it in homemade liqueurs or extracts
This dual-purpose approach ensures you get every bit of goodness from your vanilla bean.
Step 6: Store Leftover Pods
If you’re not using the pod right away, don’t let it go to waste. Pat it dry with a clean paper towel and store it in an airtight glass jar. You can keep it in your pantry for several weeks.
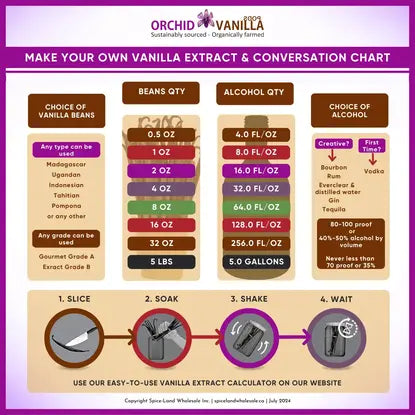
For longer storage, place the pod in alcohol (like vodka or rum) to make homemade vanilla extract. This method not only preserves the pod but also gives you a delicious flavoring agent for future use.
Cooking Tips: Making the Most of Vanilla Beans
When it comes to using vanilla beans in cooking, timing matters. Add the seeds to warm liquids like milk or cream early in the process to help the flavor diffuse thoroughly. If using in cold desserts, mix the seeds into the batter or base and allow it to rest for a few hours to deepen the flavor.
Here are a few additional tips:
-
Always split the beans fresh before use; don’t pre-split and store.
-
Combine with other spices like cinnamon or cardamom for a deeper flavor.
-
Use both seeds and pods whenever possible for full flavor extraction.
Common Mistakes to Avoid
While the process is straightforward, some common mistakes can compromise your results:
-
Cutting too deep: This may separate the pod into two pieces and make it harder to extract the seeds cleanly.
-
Using dry beans: These are hard to split and have lost much of their flavor.
-
Skipping the pod: Many people toss the pod after scraping the seeds, missing out on its extended use in infusions and flavorings.
Avoiding these pitfalls ensures you get the most out of each vanilla bean.
Final Thoughts
Knowing how to split vanilla beans is a skill every home cook or baker should master. It’s a small step, but one that yields incredibly rich and aromatic results. By taking the time to split the bean correctly, scrape out the seeds, and use the pod wisely, you’ll elevate your dishes with the unmistakable essence of pure vanilla.
Whether you’re experimenting with gourmet desserts or trying new ways of using vanilla beans in cooking, this method guarantees you’re getting the very best from your ingredients.
Now that you’ve learned the art of vanilla bean preparation, it’s time to put it into practice and experience the depth and warmth that real vanilla brings to your kitchen.


